Redirect Procurve’s output to TFTP Server

So last night I learned another Procurve command that’ll redirect the output and send it to the TFTP Server instead of the terminal client. I was hoping to use one of these days and little did I know I would get to use it as soon as I get to work today.

It just happened that I have a Procurve switch that crashed and rebooted itself multiple times. There were something odds about it so the logs need to be sent to the support staff so they can do their thing. Normally, I have my terminal clients logs all output to a file and just run Show Tech and Show Log commands then copy the files to an email. But like any other diagnostic commands, these can take a long time to run through and it’s so true when you get to enterprise line of products so I thought I’d try the command I learned last night.

Redirect Procurve’s command output directly to TFTP server:

SYNTAX:

Copy command-output “command string” tftp ipAddress dest-file-name

EXAMPLES:

Copy command-output “show tech” tftp 1.2.3.4 switchXYZ-showtech.log
Copy command-output “show log” tftp 1.2.3.4 switchXYZ-showlog.log

WHAT IT DOES:

Redirects the command output to a file then sends it to a TFTP Server.
Really handy when it comes to long running command like Show Tech or Show Log.

Note that for this to work, quotations are needed around the command for which you want to redirect the output and TFTP Server must be running (guess which TFTP Server I was running – That’s right, Pinkie!). Further more, there’s no feed back when you execute this. The only form of feedback is if you are to watch the TFTP file transfer request, you’ll see that an incoming request is initiated and the specified file appears in your TFTP folder.

Using the commands above, I was able to gather the logs in a fraction of the time that it normally takes if I was doing it the old fashion way – which is just run the Show Tech/Show Log and let the info scrolls through the screen.

Procurve’s Output redirection isn’t limited just these two aforementioned commands. You can redirect other’s command output too. Just remember to wrap the command around the quotation marks.
Procurve corrupted flash recovery

As I wrote in the blog last week, I was upgrading the code on a fairly large number of switches. And during the upgrade, I did run into a couple of issues and lost a 3500 along with a few 5406’s. I was able to fix and recover all the switches that went down in that change window.

In this blog, I’ll go into details on how I addressed the bad switches and recover them from Monitor ROM and put them back to use.

Since I don’t have a bad switch at the moment I’ll simulate this by booting into Monitor ROM by choosing option 0 when the switch first boots up. And it looks something like this:

ROM information:
Build directory: /sw/rom/build/bmrom(t2g)
Build date: Apr 24 2009
Build time: 23:33:11
Build version: K.12.20
Build number: 24648


Boot Profiles:

0. Monitor ROM Console
1. Primary Software Image
2. Secondary Software Image

Select profile (primary): 0

and here’s what the output looks like when the switch – in this case a 3500yl with 48 copper ports:

HP ProCurve Switch 3500yl-48G-PWR (J8693A)
ROM Build Directory: /sw/rom/build/bmrom(t2g)
ROM Version: K.12.20
ROM Build Date: 23:33:11 Apr 24 2009
ROM Build Number: 24648
SSC Version: SSC 34 190120060501
MSI Version: 3
CSI Version: 7
Copyright (c) 1995-2005 Hewlett-Packard Company. All rights reserved.
               RESTRICTED RIGHTS LEGEND

Use, duplication, or disclosure by the Government is subject to restrictions as set forth in subdivision (b) (3) (ii) of the Rights in Technical Data and Computer Software clause at 52.227-7013.

Hewlett-Packard Company, 3000 Hanover Street, Palo Alto, CA 94303

Enter h or ? for help.

=>

For those of you new to Procurve, the Monitor ROM prompt looks like this =>

When you are in this prompt, you can type h or ? for help:

=>h

LAN Monitor Commands

do(wnload) – Download via Xmodem
sp(eed) – Set a new baud rate
h(elp) – Display help screen
? – Display help screen
id(entify) – Print out identification string
jp(jump) – Jump to product code, optional 1-primary, 2-secondary
q(uit) – Exit the monitor
boot – Reboot the system
reset – Reset the system
v(ersion) – Display version information
lsdev – Display I/O device table
fsck – File system check
ls [path] – Terse directory listing
ll [path] – Detailed directory listing
format – Format storage device
blkdump – raw I/O
pwd – Print current working directory
cd – Change directory
mkdir – Make directory
MORE? (Ctl-C to abort)
rmdir – Remove directory
rm – Remove file
cp – Copy file
mv – Move file
cat – Dump file contents
attrib +- – Change the attributes on a file
(a)rchive, (h)idden, (s)ystem, (r)ead-only
=>

Note that the output might vary depending on switch model and code version.

If you press V it will give you version information which you can give you some clue as to what next compatible image is.

=>v
Directory: /sw/rom/build/bmrom(t2g)
Build Date: 23:33:11 Apr 24 2009
Version: K.12.20
Build #: 24648
=>

Typically, a switch will boot into Monitor ROM when it has a bad or corrupted flash or when the image is not compatible with the Boot ROM. The way to fix this is to try and put a different image on the switch; one that is compatible with the Boot ROM in the switch. By compatible, I meant the image has to have the same Boot ROM version or one revision up from the current Boot ROM in the switch.

With the software version that I have at the time, the only option I can use to restore the code is through x-modem done over the serial console which can be painfully slow since the a typical serial console connection runs at 9600 baud. To speed things along, I change the baud rate to 115200 by using command speed 115200. When you issue the aforementioned command, you’ll probably see some garbage on the screen since the switch and the computer are now running at different speed. Just change the baud rate on your terminal client to 115200 and hit enter then you’ll get the readable screen back.

To initiate the x-modem transfer, type do for download:

=>do

You have invoked the console download utility.
Do you wish to continue? (Y/N)>

The switch will prompt for confirmation. Hit Y then start the transfer. At this point, in your terminal client, start x-modem transfer and pick the firmware you want to send to the switch. You’ll end up with something like this:

Starting xmodem transfer. Press Ctrl+C to cancel.
1% 59 KB 6 KB/s 00:24:23 ETA 0 Errors

It’ll take a while to send the file. Just remember that you do not have to change the baud rate. 9600 will work just fine but it will take forever to finish. Once the file has been transferred, you can issue the command boot to reboot the switch.

Now that’s how you recover from corrupted flash/wrong code version on Procurve 3500 series switches. On the 5400 series, you can also do the same thing. However, since the 5400 series have removable management module, it can be a little bit easier – you just need some spare modules or some memory card reader.

On the 5400, as I understand it, the boot rom is flashed to NVRAM and the code and configuration files are stored in flash. So what you need to do is making sure NVRAM and flash card have the same or compatible boot rom then the so-called “corrupted flash” will work again. You can do this in two ways. One is to put the correct code on the flash card and two is to flash the correct boot-rom on the management module.

So you can use x-modem transfer to copy code as outline above for the 3500 or find a spare management module and flash compatible boot rom to it, swap out the flash card then put it back to the switch. Since the configuration file is stored on the flash card, you won’t have to reconfigure the switch.

Now here’s something that I’ve been thinking about but haven’t tried yet since I don’t have a card reader handy. The code is stored on a flash card, you can probably use a generic card reader and update it unless Procurve is using some sort of proprietary file system.

I hope with the information above, it can help you restore corrupted flash on Procurve switches. If I have left something out or if you have any tips to share, feel free to leave a comment.

Procurve Code Upgrade

showcmd

I just recently when through a round of code upgrade (at least 3 firmware versions each) on 300+ Procurve switches and so I thought I’d share with you what I had gone through.

My buddy Dean & I were tasked to upgrade a number of switches.  What we did was breaking them down into three phases spanning 3 days for a total of 16 hours window.  Although we had HP Network Automation (HPNA) available at our disposal, but I chose to do this manually due to a number of factors including code version inconsistency, boot room, primary vs secondary software image… Plus I also wanted to see how far we can push Pinkie so it was a perfect scenario doing the upgrade manually.

First, let’s talk about how we can push the images to the switches then we’ll go through the issues encountered during the upgrade and how to tackle them.  So, there are a number of ways you can get a firmware onto a HP Procurve switch. Let’s walk through them real quick:

1. X-modem: Slow, unsuitable for production environment upgrade.  Handy to recover corrupted flash.

2. USB Drive: Fast, efficient way to transfer, only available on certain code version.  Not suiteable large scale upgrade.

3. TFTP: Fast, efficient, requires IP connectivity.  Suiteable for production code upgrade.

Of the available options, only TFTP file transfer was suitable to do what we wanted to accomplished.  There were a number of TFTP servers available but being that I wrote Pinkie, I wouldn’t want to use any other TFTP server but Pinkie itself.

So how did we manage to upgrade 3 or more code versions on 300+ switches in under 16 hours change window?  Preparation.  Preparation was the key.  Prior to the actual change window, we staged both primary and secondary firmware with the next code versions.  If you are not familiar with Procurve firmware, they have to be upgraded sequentially since the firmware ties in with the boot-rom (I’ll explain in another blog post).  When the change window came, we used our terminal client and SSH’ed into the switches, rebooted them while having Pinkie constantly pinging them.  As soon as they came backup, we logged in again booted to the other image using the boot-system flash [primary/secondary] command.  After they came up the second time around, we pushed the third and final firmware (for most of them) to the switches using copy tftp flash command and rebooted again.  All the commands were prepared in little code snippets and pasted into the terminal client so it went rather smoothly.

At some point during the operation we had pushed Pinkie so hard (there were some 30-40 simultaneous TFTP requests going at the same time) that it locked up the user interface.  We thought for sure that it’s gonna crash but Pinkie hung in there and finished all TFTP file transfers even though the screen didn’t get updated for quite some time.

During the process, we ran into a number of issues.  One Procurve 3500 yl switch had corrupted flash.  We didn’t have time to repair the corrupted flash on the 3500 on the spot so we replaced the whole switch and opted to repair it later when we have some time on hand.  And it was successfully repaired using x-modem file transfer the next day.

There were a handful of 5406 yl switches that had corrupted flash also.  But for those, we were able to pull out the management cards and swapped out the flash memory then put them back to service.  The thing is you’ve gotta have a spare management module with the flash card that has firmware compatible with the boot rom on the bad management module.

Below are some commands that we used during the code upgrade process:

boot – reboot the switch to the current image.

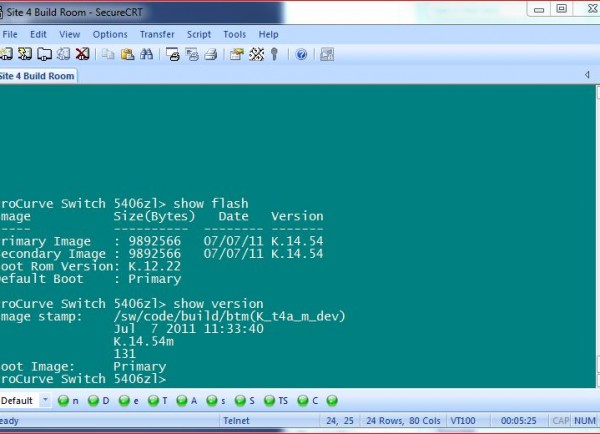
show flash – show the firmware version on both primary and secondary boot images.

show version – show the running firmware and next boot image.

copy tftp flash… – initiates a file transfer request and copy the firmware from tftp server to the switch.

copy flash flash [primary/secondary] – copy the firmware from one slot to another.

That’s pretty much how we did it but like I said in the beginning, we broke it down into 3 phases.  The first phase we did it on a single POD of about 40 switches to get a feel for it then we double it on the second phase and finally on the third one, we did the rest of them.

One important thing I should note is that you need to look out for distribution switches – either do them first or do them last.  I overlooked one of them and as the result, I had to wait for it to finish before I could touch the aggregation & edge switches.  And it just happened that one of the distribution switches had corrupted flash so that delayed our code upgrade process longer than expected; although we did finish it under our reserved window for the change.

There you have it.  That’s how I did my firmware upgrade and the issue that I ran into during the process.  If you have any tips & tricks on how it could be done better, by all means, let me know.